

Fixed Length Files With Spring Batch 6.0: The "Joy" of Legacy Data
If you are a developer who has handled payroll processing or bank/financial reconciliation at a company that uses Spring, you have likely worked with Spring Batch. I confess I’m not a huge fan; it has that characteristic verbosity and overhead of the Java ecosystem, making it feel like even the simplest job requires far more structure than necessary. But what good is complaining? The technology your company uses is what ensures your survival (housing, food, clothing). So, whining isn’t the topic for today.
The scope of this post is extremely simple: given a positional file generated via a mainframe using the template below, we will create a Spring Batch application (using version 6.0, the latest as of today) to easily read the file, create an object, and output the content to the console in JSON format. The key part here is reading the file and transforming it into a standard Java object. As for the writing step, you can handle it however you like: save it to a database, write to another file, whatever the hell you want to do.
For this, we will consider the template below:
| FIELD | START | END | LENGTH | FORMAT (COBOL PIC) | DATA TYPE | DESCRIPTION |
|---|---|---|---|---|---|---|
| COMIC-TITLE | 01 | 30 | 30 | PIC X(30) |
ALPHANUMERIC | The title of the comic book. Left-aligned, space padded. |
| ISSUE-NUM | 31 | 35 | 05 | PIC 9(05) |
NUMERIC (ZONED) | The issue sequence number. Right-aligned, zero padded. |
| PUBLISHER | 36 | 55 | 20 | PIC X(20) |
ALPHANUMERIC | The name of the publisher. Left-aligned, space padded. |
| PUB-DATE | 56 | 65 | 10 | PIC X(10) |
DATE (ISO) | Publication date in YYYY-MM-DD format. Treated as text. |
| CVR-PRICE | 66 | 72 | 07 | PIC 9(07) |
NUMERIC (ZONED) | Cover price. Right-aligned, zero padded. Note: Decimal handling depends on parsing logic. |
And let’s assume we are receiving the file below on the distributed platform. Note that when dealing with numeric formats (PIC 9), we fill the field with leading zeros, and for alphanumeric fields (PIC X), we pad the fixed length with trailing spaces.
Action Comics                 00001DC Comics           1938-04-180000.10
Detective Comics              00027DC Comics           1939-03-300000.10
Batman                        00001DC Comics           1940-04-240000.10
Superman                      00001DC Comics           1939-05-180000.10
Wonder Woman                  00001DC Comics           1942-07-220000.10
Flash Comics                  00001DC Comics           1940-01-010000.10
Green Lantern                 00001DC Comics           1941-07-010000.10
Amazing Fantasy               00015Marvel              1962-08-100000.12
The Incredible Hulk           00001Marvel              1962-05-010000.12
Fantastic Four                00001Marvel              1961-11-010000.10
Journey into Mystery          00083Marvel              1962-08-010000.12
Tales of Suspense             00039Marvel              1963-03-010000.12
The X-Men                     00001Marvel              1963-09-010000.12
The Avengers                  00001Marvel              1963-09-010000.12
Daredevil                     00001Marvel              1964-04-010000.12
Showcase                      00004DC Comics           1956-09-010000.10
Justice League of America     00001DC Comics           1960-10-010000.10
The Brave and the Bold        00028DC Comics           1960-02-010000.10
Swamp Thing                   00001DC Comics           1972-10-010000.20
Giant-Size X-Men              00001Marvel              1975-05-010000.50
Crisis on Infinite Earths     00001DC Comics           1985-04-010000.75
Watchmen                      00001DC Comics           1986-09-010001.50
The Dark Knight Returns       00001DC Comics           1986-02-010002.95
Maus                          00001Pantheon            1986-01-010003.50
Sandman                       00001Vertigo             1989-01-010001.50
Spawn                         00001Image Comics        1992-05-010001.95
Savage Dragon                 00001Image Comics        1992-06-010001.95
WildC.A.T.s                   00001Image Comics        1992-08-010001.95
Youngblood                    00001Image Comics        1992-04-010002.50
Hellboy: Seed of Destruction  00001Dark Horse          1994-03-010002.50
Sin City                      00001Dark Horse          1991-04-010002.25
Preacher                      00001Vertigo             1995-04-010002.50
The Walking Dead              00001Image Comics        2003-10-010002.99
Invincible                    00001Image Comics        2003-01-010002.99
Saga                          00001Image Comics        2012-03-140002.99
Paper Girls                   00001Image Comics        2015-10-070002.99
Monstress                     00001Image Comics        2015-11-040004.99
Descender                     00001Image Comics        2015-03-040002.99
East of West                  00001Image Comics        2013-03-270003.50
Ms. Marvel                    00001Marvel              2014-02-010002.99
Miles Morales: Spider-Man     00001Marvel              2018-12-120003.99
House of X                    00001Marvel              2019-07-240005.99
Powers of X                   00001Marvel              2019-07-310005.99
Batman: Court of Owls         00001DC Comics           2011-09-210002.99
Doomsday Clock                00001DC Comics           2017-11-220004.99
Immortal Hulk                 00001Marvel              2018-06-060004.99
Something is Killing Child    00001BOOM! Studios       2019-09-040003.99
Department of Truth           00001Image Comics        2020-09-300003.99
Nice House on the Lake        00001DC Black Label      2021-06-010003.99
Ultimate Spider-Man           00001Marvel              2024-01-100005.99
Let’s begin.
1. Initial configuration that every Java dev hates
To speed up the base creation, I set up a project using spring initializr. Basically, I created a Spring Boot project with Maven, Java 21, and Spring Boot 4.0.0. Yes, I created it without any dependencies, since I’ll be manually editing the pom.xml. I believe Spring Boot 4.0 already ships with Spring Batch 6 (if added as a dependency), but honestly, there are things I prefer to tweak manually.
With the project created, let’s build our pom.xml:
<?xml version="1.0" encoding="UTF-8"?>
<project xmlns="http://maven.apache.org/POM/4.0.0"
         xmlns:xsi="http://www.w3.org/2001/XMLSchema-instance"
         xsi:schemaLocation="http://maven.apache.org/POM/4.0.0 https://maven.apache.org/xsd/maven-4.0.0.xsd">
    <modelVersion>4.0.0</modelVersion>

    <parent>
        <groupId>org.springframework.boot</groupId>
        <artifactId>spring-boot-starter-parent</artifactId>
        <version>4.0.0</version>
        <relativePath/>
    </parent>

    <groupId>me.doismiu</groupId>
    <artifactId>spring-batch-bean-io</artifactId>
    <version>0.0.1-SNAPSHOT</version>
    <name>spring-batch-bean-io</name>
    <description>Spring Batch 6 BeanIO Example</description>

    <properties>
        <java.version>21</java.version>
        <spring-batch.version>6.0.0</spring-batch.version>
        <spring-framework.version>7.0.0</spring-framework.version>
    </properties>

    <dependencies>
        <dependency>
            <groupId>org.springframework.boot</groupId>
            <artifactId>spring-boot-starter-batch</artifactId>
        </dependency>

        <dependency>
            <groupId>org.postgresql</groupId>
            <artifactId>postgresql</artifactId>
            <scope>runtime</scope>
        </dependency>

        <dependency>
            <groupId>org.springframework.boot</groupId>
            <artifactId>spring-boot-starter-jdbc</artifactId>
        </dependency>

        <dependency>
            <groupId>org.beanio</groupId>
            <artifactId>beanio</artifactId>
            <version>2.1.0</version>
            <exclusions>
                <exclusion>
                    <groupId>org.springframework.batch</groupId>
                    <artifactId>spring-batch-core</artifactId>
                </exclusion>
                <exclusion>
                    <groupId>org.springframework.batch</groupId>
                    <artifactId>spring-batch-infrastructure</artifactId>
                </exclusion>
                <exclusion>
                    <groupId>org.springframework</groupId>
                    <artifactId>spring-beans</artifactId>
                </exclusion>
            </exclusions>
        </dependency>

        <dependency>
            <groupId>com.fasterxml.jackson.core</groupId>
            <artifactId>jackson-databind</artifactId>
        </dependency>
        <dependency>
            <groupId>com.fasterxml.jackson.datatype</groupId>
            <artifactId>jackson-datatype-jsr310</artifactId>
        </dependency>

        <dependency>
            <groupId>org.springframework.boot</groupId>
            <artifactId>spring-boot-starter-test</artifactId>
            <scope>test</scope>
        </dependency>
        <dependency>
            <groupId>org.springframework.batch</groupId>
            <artifactId>spring-batch-test</artifactId>
            <scope>test</scope>
        </dependency>
    </dependencies>

    <build>
        <plugins>
            <plugin>
                <groupId>org.springframework.boot</groupId>
                <artifactId>spring-boot-maven-plugin</artifactId>
            </plugin>
        </plugins>
    </build>

    <repositories>
        <repository>
            <id>spring-milestones</id>
            <name>Spring Milestones</name>
            <url>https://repo.spring.io/milestone</url>
            <snapshots>
                <enabled>false</enabled>
            </snapshots>
        </repository>
        <repository>
            <id>spring-snapshots</id>
            <name>Spring Snapshots</name>
            <url>https://repo.spring.io/snapshot</url>
            <releases>
                <enabled>false</enabled>
            </releases>
        </repository>
    </repositories>
    <pluginRepositories>
        <pluginRepository>
            <id>spring-milestones</id>
            <name>Spring Milestones</name>
            <url>https://repo.spring.io/milestone</url>
            <snapshots>
                <enabled>false</enabled>
            </snapshots>
        </pluginRepository>
        <pluginRepository>
            <id>spring-snapshots</id>
            <name>Spring Snapshots</name>
            <url>https://repo.spring.io/snapshot</url>
            <releases>
                <enabled>false</enabled>
            </releases>
        </pluginRepository>
    </pluginRepositories>
</project>
As you might have noticed, we will be working with the following libs in this project:
-
Spring Batch 6.0
-
Spring Boot 4.0.0
-
Spring Boot Starter JDBC. Since we have to configure the
TransactionManagerfor the database connection, we’ll need this lib. -
BeanIO 2.1.0. The lib that performs the magic of converting positional fields into object attributes; plus, it comes with a series of special classes for Spring Batch!
-
Jackson libs to easily convert the object into a JSON structure in our Writer.
Now, we will create our Main structure and the database connection. Here we see the first major change in Spring Batch 6: the so-called "Resourceless batch infrastructure by default". Anyone who has worked with Spring Batch knows it was almost always necessary to link the Batch to a database, as this technology stores metadata for Job and Step executions, which are of extreme importance for execution control. However, in the latest version, Batch doesn’t need to be linked to any database by default. As I mentioned, since this is important, we will configure it anyway. In our scenario, the batch requires the structure below to run:
In this project, I used PostgreSQL via Docker to make things easier, but it should work with any database, even NoSQL ones like MongoDB. To do this, I created the following docker compose.
version: '3.8'
services:
  postgres:
    image: postgres:15-alpine
    container_name: comic_postgres
    environment:
      POSTGRES_USER: user
      POSTGRES_PASSWORD: password
      POSTGRES_DB: comicbatch
    ports:
      - "5432:5432"
    volumes:
      - postgres_data:/var/lib/postgresql/data

volumes:
  postgres_data:
But as I said, any database will do. After bringing up the docker compose, we’ll have a container named comic_postgres running on our local Docker. With that, we can proceed to configure our project’s application.properties file.
spring.application.name=spring-batch-bean-io
spring.datasource.url=jdbc:postgresql://localhost:5432/comicbatch
spring.datasource.username=user
spring.datasource.password=password
spring.datasource.driver-class-name=org.postgresql.Driver
logging.level.org.springframework.jdbc.core=DEBUG
logging.level.org.springframework.transaction=DEBUG
spring.batch.jdbc.initialize-schema=never
Here I configured JDBC not to create tables upon initialization. THEORETICALLY, Batch should create the metadata structure without any issues, but I admit I’ve used Spring Batch versions 4 and 5 extensively, and it NEVER created the structure correctly. This leads to application runtime errors, most likely due to missing columns or incorrect typing. Even worse would be grabbing some random script off the internet and creating the tables directly in the database. Instead, we have a solution that reads the correct structure provided by the library itself and adapts it to the database type we are using. Here is how our Main class looks, implementing this database logic:
package me.doismiu.fixedlength;

import org.springframework.boot.SpringApplication;
import org.springframework.boot.autoconfigure.SpringBootApplication;
import org.springframework.context.annotation.Bean;
import org.springframework.core.io.ClassPathResource;
import org.springframework.jdbc.datasource.init.DataSourceInitializer;
import org.springframework.jdbc.datasource.init.ResourceDatabasePopulator;

import javax.sql.DataSource;

@SpringBootApplication
public class ComicBatchApplication {

    public static void main(String[] args) {
        System.exit(
                SpringApplication.exit(
                        SpringApplication.run(ComicBatchApplication.class, args)));
    }

    @Bean
    public DataSourceInitializer databaseInitializer(DataSource dataSource) {
        ResourceDatabasePopulator populator = new ResourceDatabasePopulator();
        populator.addScript(new ClassPathResource("org/springframework/batch/core/schema-postgresql.sql"));
        populator.setContinueOnError(true);
        DataSourceInitializer initializer = new DataSourceInitializer();
        initializer.setDataSource(dataSource);
        initializer.setDatabasePopulator(populator);
        return initializer;
    }

}
This ensures that on the first Batch run, it creates the proper structure expected by the framework, since the creation file is provided by Spring Batch itself. Note that I also included the line populator.setContinueOnError(true). This means that whenever there is an SQL structure error, it will be ignored, given that this script will run with every execution of the Batch. There are more elegant ways to handle this, or you could even remove this method after the first run if you prefer. But for our example, it works just fine.
Let’s take this opportunity to finalize the database configuration by creating an empty class, but with annotations specifying the TransactionManager configuration:
package me.doismiu.fixedlength.config;

import org.springframework.batch.core.configuration.annotation.EnableBatchProcessing;
import org.springframework.batch.core.configuration.annotation.EnableJdbcJobRepository;
import org.springframework.context.annotation.Configuration;
import org.springframework.transaction.annotation.Isolation;

@Configuration
@EnableBatchProcessing
@EnableJdbcJobRepository(dataSourceRef = "dataSource", transactionManagerRef = "transactionManager", isolationLevelForCreate = Isolation.READ_COMMITTED, tablePrefix = "BATCH_")
public class JDBCJobRepositoryConfig {

}
2. The object with BeanIO annotations
For this project, we need to create a model called Comic containing the information from the positional template I showed at the beginning of the post. We can do this via XML or via annotation, it’s a matter of personal taste. In this project’s example, I will use the annotation version, as I feel it organizes the structure of a positional template more simply.
package me.doismiu.fixedlength.model;

import org.beanio.annotation.Field;
import org.beanio.annotation.Record;
import org.beanio.builder.Align;

import java.math.BigDecimal;
import java.time.LocalDate;

@Record
public class Comic {

    @Field(at = 0, length = 30, padding = ' ', align = Align.LEFT)
    private String title;

    @Field(at = 30, length = 5, padding = '0', align = Align.RIGHT)
    private int issueNumber;

    @Field(at = 35, length = 20, padding = ' ', align = Align.LEFT)
    private String publisher;

    @Field(at = 55, length = 10, format = "yyyy-MM-dd")
    private LocalDate publicationDate;

    @Field(at = 65, length = 7, padding = '0', align = Align.RIGHT)
    private BigDecimal coverPrice;

    // Getters and Setters
}
Regarding the model, a few points are worth highlighting:
-
The attributes don’t necessarily need to be in the template’s order, but I strongly recommend keeping them that way to facilitate code maintenance.
-
We use the padding + align logic to fill with leading zeros or trailing spaces, as stipulated in the file layout. Furthermore, we tell BeanIO that the expected date field has a defined format. We’ll talk more about this when writing the application’s Reader.
And that’s it, simple as that. Now let’s move on to creating our Reader and Writer.
3. A Reader that justifies this post’s existence, a Writer that does whatever the hell it wants
Typically, Batch logic dictates creating an application in the following order: Job -> Step -> Reader/Processor/Writer. But since each piece depends on the latter, we’ll start from the end.
In our Reader, we will use the best that BeanIO offers for Batches. We’ll create our file reading logic using the library’s standard StreamBuilder. We will also use BeanIO’s own Skip logic to avoid re-reading database entries when resuming a service that has been interrupted. For this to work, instead of using the standard Batch FileFlatItemReader, we will use AbstractItemCountingItemStreamItemReader. This allows us to resume any reading process that was interrupted, combined with the JumpItem logic we create with BeanIO. Basically, we will configure the StreamBuilder in the class constructor and handle the opening and closing of streams properly. This gives us the following reader:
package me.doismiu.fixedlength.reader;

import me.doismiu.fixedlength.handler.LocalDateTypeHandler;
import me.doismiu.fixedlength.model.Comic;
import org.beanio.BeanReader;
import org.beanio.StreamFactory;
import org.beanio.builder.FixedLengthParserBuilder;
import org.beanio.builder.StreamBuilder;

import org.springframework.batch.infrastructure.item.ItemStreamException;
import org.springframework.batch.infrastructure.item.support.AbstractItemCountingItemStreamItemReader;
import org.springframework.core.io.Resource;
import org.springframework.util.Assert;

import java.io.InputStreamReader;
import java.nio.charset.StandardCharsets;
import java.time.LocalDate;

public class ComicItemsReader extends AbstractItemCountingItemStreamItemReader<Comic> {

    private final Resource resource;
    private final StreamFactory streamFactory;
    private BeanReader beanReader;

    public ComicItemsReader(Resource resource) {
        this.resource = resource;

        setName("comicItemsReader");

        this.streamFactory = StreamFactory.newInstance();
        StreamBuilder builder = new StreamBuilder("comicStream")
                .format("fixedlength")
                .parser(new FixedLengthParserBuilder())
                .addTypeHandler(LocalDate.class, new LocalDateTypeHandler("yyyy-MM-dd"))
                .addRecord(Comic.class);
        this.streamFactory.define(builder);
    }

    @Override
    protected void jumpToItem(int itemIndex) throws Exception {
        if (beanReader != null) {
            beanReader.skip(itemIndex);
        }
    }

    @Override
    protected void doOpen() throws Exception {
        Assert.notNull(resource, "Input resource must be set");

        if (!resource.exists()) {
            throw new ItemStreamException("Input resource does not exist: " + resource);
        }

        this.beanReader = streamFactory.createReader(
                "comicStream",
                new InputStreamReader(resource.getInputStream(), StandardCharsets.UTF_8));
    }

    @Override
    protected Comic doRead() throws Exception {
        if (beanReader == null) {
            return null;
        }
        return (Comic) beanReader.read();
    }

    @Override
    protected void doClose() throws Exception {
        if (beanReader != null) {
            beanReader.close();
            beanReader = null;
        }
    }
}
Note that when implementing this class, the compiler will flag an error on the following line:
.addTypeHandler(LocalDate.class, new LocalDateTypeHandler("yyyy-MM-dd"))
This is because we haven’t created the LocalDateTypeHandler yet. And why do we need a specific handler for dates? In a sample application, I could ignore a LocalDate attribute and handle everything as Strings and Ints. But as I said, one of the main types of files processed in batches relates to payments. And payments have dates. We want to be able to manipulate this attribute as a date. If we run the reader without our TypeHandler logic, we’ll get the following error:
org.springframework.beans.factory.UnsatisfiedDependencyException: Error creating bean with name 'importComicJob' defined in class path resource [me/doismiu/fixedlength/job/ComicPrinterJob.class]: Unsatisfied dependency expressed through method 'importComicJob' parameter 1: Error creating bean with name 'printStep' defined in class path resource [me/doismiu/fixedlength/step/ComicPrinterStep.class]: Unsatisfied dependency expressed through method 'printStep' parameter 2: Error creating bean with name 'comicItemsReader' defined in class path resource [me/doismiu/fixedlength/step/ComicPrinterStep.class]: Failed to instantiate [me.doismiu.fixedlength.reader.ComicItemsReader]: Factory method 'comicItemsReader' threw exception with message: Invalid field 'publicationDate', in record 'comic', in stream 'comicStream': Type handler not found for type 'java.time.LocalDate'
In short: BeanIO doesn’t provide a default TypeHandler for LocalDate with the format we want. That’s why we’ll create a class to solve this.
package me.doismiu.fixedlength.handler;

import org.beanio.types.ConfigurableTypeHandler;
import org.beanio.types.TypeHandler;

import java.time.LocalDate;
import java.time.format.DateTimeFormatter;
import java.util.Properties;

public class LocalDateTypeHandler implements ConfigurableTypeHandler {

    private final DateTimeFormatter formatter;

    public LocalDateTypeHandler(String pattern) {
        this.formatter = DateTimeFormatter.ofPattern(pattern);
    }

    @Override
    public TypeHandler newInstance(Properties properties) throws IllegalArgumentException {
        String format = properties.getProperty("format");
        if (format == null || format.isEmpty()) {
            return this;
        }
        return new LocalDateTypeHandler(format);
    }

    @Override
    public Object parse(String text) {
        if (text == null || text.trim().isEmpty()) {
            return null;
        }
        return LocalDate.parse(text, formatter);
    }

    @Override
    public String format(Object value) {
        if (value == null) {
            return null;
        }
        return ((LocalDate) value).format(formatter);
    }

    @Override
    public Class<?> getType() {
        return LocalDate.class;
    }
}
Basically, we are registering our custom format type, simple as that. Now we finally have our LocalDateTypeHandler created and linked to our Reader. It’s that easy.
For our Writer, as specified, the scope of this project is just to show the file output in the console as JSON to prove we are using real Objects. Here, simply implementing ItemWriter is enough. But you can do whatever you want with the data; it’s up to you. I won’t dwell on the Writer any longer.
package me.doismiu.fixedlength.writer;

import com.fasterxml.jackson.databind.ObjectMapper;
import com.fasterxml.jackson.databind.SerializationFeature;
import com.fasterxml.jackson.datatype.jsr310.JavaTimeModule;
import me.doismiu.fixedlength.model.Comic;
import org.slf4j.Logger;
import org.slf4j.LoggerFactory;
import org.springframework.batch.infrastructure.item.Chunk;
import org.springframework.batch.infrastructure.item.ItemWriter;
import org.springframework.stereotype.Component;

import java.util.List;

@Component
public class ComicPrinterWriter implements ItemWriter<Comic> {

    private static final Logger LOGGER = LoggerFactory.getLogger(ComicPrinterWriter.class);
    private final ObjectMapper objectMapper;

    public ComicPrinterWriter() {
        this.objectMapper = new ObjectMapper();
        this.objectMapper.registerModule(new JavaTimeModule());
        this.objectMapper.disable(SerializationFeature.WRITE_DATES_AS_TIMESTAMPS);
        this.objectMapper.enable(SerializationFeature.INDENT_OUTPUT);
    }

    @Override
    public void write(Chunk<? extends Comic> chunk) throws Exception {
        LOGGER.info("--- Writing Batch of {} items as JSON ---", chunk.size());
        List<? extends Comic> items = chunk.getItems();
        String jsonOutput = objectMapper.writeValueAsString(items);
        System.out.println(jsonOutput);
    }
}
4. The missing Job and Step to finalize the project
With the Reader and Writer created, we generate the Step that will orchestrate both. Nothing complex here, just a standard Step with some failure handling and where we specify the Resource for our TXT file. If you are using this example for Production, the handling should be more specific, as well as the logic to correctly return the application exit code. But for our example, the code below works:
package me.doismiu.fixedlength.step;

import me.doismiu.fixedlength.model.Comic;
import me.doismiu.fixedlength.reader.ComicItemsReader;
import me.doismiu.fixedlength.writer.ComicPrinterWriter;
import org.springframework.batch.core.repository.JobRepository;
import org.springframework.batch.core.step.Step;
import org.springframework.batch.core.step.builder.StepBuilder;
import org.springframework.beans.factory.annotation.Value;
import org.springframework.context.annotation.Bean;
import org.springframework.context.annotation.Configuration;
import org.springframework.core.io.FileSystemResource;
import org.springframework.transaction.PlatformTransactionManager;

@Configuration
public class ComicPrinterStep {

    @Value("${input.file.path:data/comics.txt}")
    private String inputFilePath;

    @Bean
    public ComicItemsReader comicItemsReader() {
        return new ComicItemsReader(new FileSystemResource(inputFilePath));
    }

    @Bean
    public Step printStep(JobRepository jobRepository,
            PlatformTransactionManager transactionManager,
            ComicItemsReader reader,
            ComicPrinterWriter writer) {
        return new StepBuilder("comicPrinterStep", jobRepository)
                .<Comic, Comic>chunk(10)
                .transactionManager(transactionManager)
                .reader(reader)
                .writer(writer)
                .faultTolerant()
                .skipLimit(1)
                .skip(IllegalArgumentException.class)
                .build();
    }
}
And with that, we’ve created our Job.
package me.doismiu.fixedlength.job;

import org.springframework.batch.core.configuration.annotation.EnableJdbcJobRepository;
import org.springframework.batch.core.job.Job;
import org.springframework.batch.core.job.builder.JobBuilder;
import org.springframework.batch.core.job.parameters.RunIdIncrementer;
import org.springframework.batch.core.repository.JobRepository;
import org.springframework.batch.core.step.Step;
import org.springframework.context.annotation.Bean;
import org.springframework.context.annotation.Configuration;
import org.springframework.transaction.annotation.Isolation;

@Configuration
public class ComicPrinterJob {
    @Bean
    public Job importComicJob(JobRepository jobRepository, Step printStep) {
        return new JobBuilder("importComicJob", jobRepository)
                .incrementer(new RunIdIncrementer())
                .start(printStep)
                .build();
    }
}
And with that, we’ve created our Job.With that, we have the entire structure set up.
5. Testing what needs to be tested
Now we are ready to run our final application.

We can observe the generated JSON in the console and the successfully established database connection. And since we created a metadata structure to control execution, we can go directly to the database to check execution details:
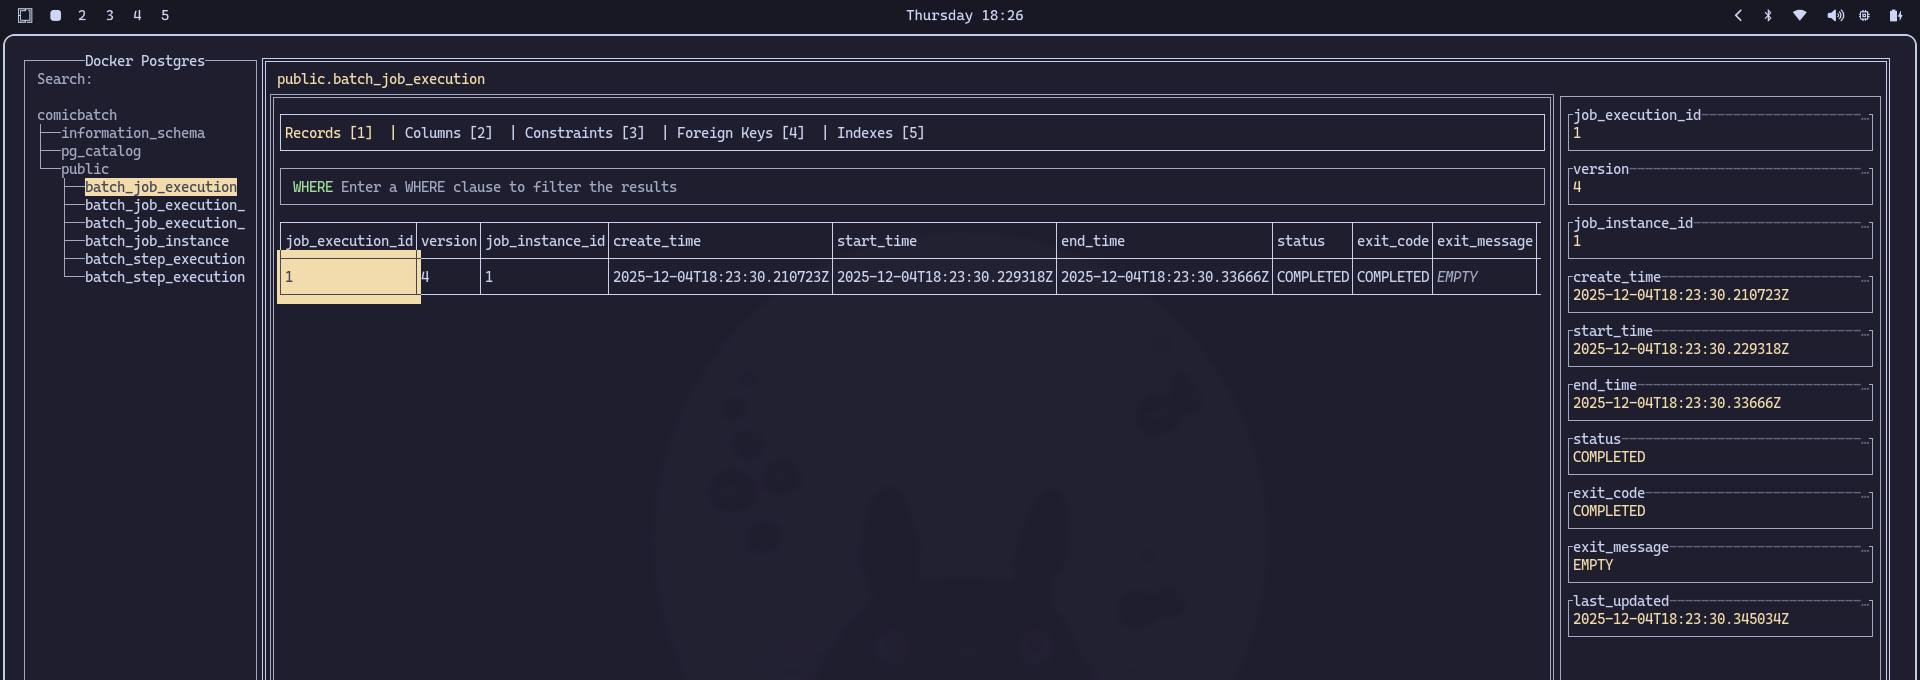
HUGE SUCCESS!
6. Conclusion
With this, we now have the basic logic for reading fixed-width positional files. It’s nothing complex, but since this blog aims to be a backup of my knowledge, at least I’m leaving a record here so I don’t forget it again.
See you next time!